Working with the Google Maps API
Whoever would have thought that Microsoft could devise something that reignited interest in web development again and started a whole new wave of Web 2.0 sites? AJAX, which stands for Asynchronous JavaScript And XML, is a technique (rather than a technology) that exchanges small amounts of data with servers that are working behind the scene.
Basically it means that web pages don't need to be reloaded for them to receive new data. AJAX relies heavily on the XMLHttpRequest object, originally a Microsoft ActiveX object, which is used for establishing a connection between the client side and the server side.
- The best Google APIs and how to use them
Despite the XMLHttpRequest object being around since the dotcom boom, it's popularity has only increased recently with the explosion of the Web 2.0 movement. AJAX is now synonymous with Web 2.0, and any new Web 2.0 site is almost expected to have some sort of AJAX. Forerunners, which skyrocketed the popularity of these new methods, include Google Suggest, Writely and Flickr, but possibly the most notable of the Web 2.0 movement was the Google Maps API.
- Explore our guides to the best JavaScript APIs and HTML APIs
With its dragging interface and pop-up bubbles. It was a completely new way of interacting not only with maps but also with web pages. With the Google Maps' API you can have the power of its mapping interface on your site. Many people have already used it to created mashup sites, which combine data from various sources and form it into a new way of viewing the data. For example, HousingMaps.com places Craigslist property listings on a Google map, while Chicagocrime.org lets you view a map of crime locations in Chicago.
Making your map
The first thing you need to do is sign up for a Google Maps API key. Without it, you can't use Google's API. Go to Google and follow the instructions – they're really simple to follow and it shouldn't take longer than a minute or two to sign up for a key.
You can now easily set up a simple map, 700 pixels wide by 500 pixels high. Make sure it's an HTML file and call it index.html:
<!DOCTYPE html PUBLIC "-//W3C//DTD XHTML 1.0 Strict//EN" "http://www.w3.org/TR/xhtml1/DTD/xhtml1-strict.dtd"><html xmlns="http://www.w3.org/1999/xhtml"><head><meta http-equiv="content-type" content="text/html; charset=utf-8"/><title>Google Maps</title><script src="http://maps.google.com/maps?file=api&v=2&key=YOUR_API_KEY" type="text/javascript"></script><script type="text/javascript" src="map.js"></script><link rel="stylesheet" href="style.css" type="text/css" media="all" title="" /</head><body><div id="map" style="width: 700px; height: 500px"><span id="maploading">Loading Map</span></div></body> Now create a JavaScript file called map.js:
function load () {var map = document.getElementById("map");if (GBrowserIsCompatible()) {var gmap = new GMap2(map);gmap.addControl( new GSmallMapControl() );gmap.addControl( new GMapTypeControl()) ;gmap.addControl( new GOverviewMapControl(new GSize(100,100)) );gmap.setCenter( new GLatLng(54.7,-4), 5 );} else {alert("Sorry, your browser cannot handle the true power of Google Maps");}}window.onload = load;window.onunload = GUnload; The JavaScript finds the tag with the ID name 'map' in the HTML (line two) and, if the browser can handle Google Maps (line three), places a new map within the tag marked map in the HTML (line four). You can then add some controls to the maps, namely the control arrows in the top left (line five), a map type selector in the top right (line six), and a 100 by 100 pixel map overview in the bottom right (line seven). Then set the centre of the map to latitude 54.7 degrees and -4 degrees longitude (which is somewhere in the sea near Cumbria), with a magnification of five (line eight), and you'll get a nice map of the UK.

Obviously, a map of the UK with nothing on it is a bit boring for the average visitor. Putting something on the map would be a nice idea, but you'll need some information to put on there as well. Information with a structure would be nice, too. Most people would immediately think of XML when information with structure is talked about, but because you're using JavaScript for this, you can use a different technology.
Introducing JSON
JSON (pronounced 'Jason') stands for JavaScript Object Notation and is a lightweight data format, similar to XML. The advantage that JSON has over XML when used in JavaScript is that it's very easy to parse and traverse. Take the following XML document as an example:
<root><email type="work">rik@test.com</email></root> You could have a similar JSON file such as this:
{ "root" : { "email" : { "type": "work", "value": "rik@test.com"}}} In JavaScript, to get the 'value' value (which, in this case, is rik@test.com), you can just type 'root.email.value', which is easier than traversing an XML tree, especially when the information you want to put on your site starts to get more complicated. Also, it's not just strings that can be in JSON, it can be arrays, functions – basically any JavaScript, so it's very useful. In fact, companies such as Google and Yahoo! are now using JSON and offer JSON outputs for their APIs. If it's good enough for Google, it's good enough for us!
Obviously, you'll need some information to go on the map so let's make a JSON file with some data in it. I'm going to make a map showing the weekend's football fixtures and, to add some interest for the visitor, I'm going to put in some lovely football-related details about the matches. So let's now make a JSON file called points.json:
{"markers": [{ "point":new GLatLng(53.478093,-2.116116), "homeTeam": "Manchester United", "awayTeam": "Arsenal", "information": "Fusce adipiscing. Pellentesque semper risus eget eros.", "fixture": "Sunday 4pm", "capacity": "67,000", "previousScore": "2-1"},{"point": new GLatLng(51.534229,-0.111312), "homeTeam": "Newcastle", "awayTeam": "Chelsea", "information": "Morbi at sapien. Quisque vitae eros nec orci elementumbibendum.", "fixture": "Saturday 3pm", "capacity": "45,000", "tv": "Eye TV"}] } The next task is to put some markers on the map, based on the point value of each marker in the array named markers, and maybe have an information window containing some of the details. To make this possible, you'll need to add some functions to map.js:
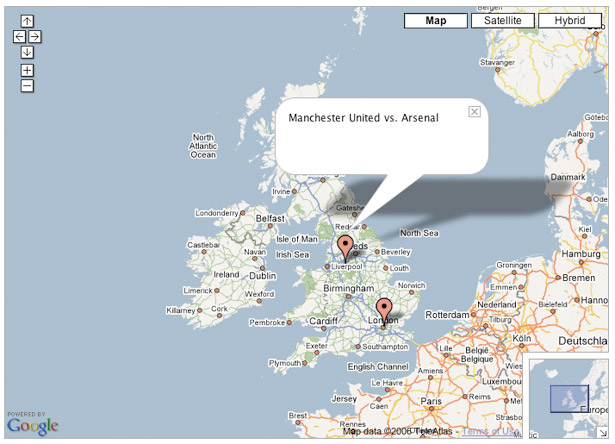
function createMarker(input) {var marker = new GMarker(input.point);GEvent.addListener(marker, "click", function() {marker.openInfoWindowHtml( input.homeTeam + " vs. " + input.awayTeam );});return marker;}function parseJson (doc) {var jsonData = eval("(" + doc + ")");for (var i = 0; i < jsonData.markers.length; i++) {var marker = createMarker(jsonData.markers[i]);gmap.addOverlay(marker);}}GDownloadUrl("points.json", function(data, responseCode) {parseJson(data);}); I'll explain what's going on with this segment of code from the bottom up. GDownloadUrl is part of Google Maps' API and it uses AJAX to get the contents of the points.json file and passes the results to the parseJson function. The parseJson function takes the results and converts them from one long string of data into a nest of objects using the eval function. Now it's possible to traverse the JSON file easily. You can then cycle through the array in the JSON file, sending each separate object to the createMarker function. The createMarker function places a marker on the map based on the point value and opens an information window when clicked, which will contain the home team name versus the away team name. After the function returns, the marker is added to the map using the API function addOverlay.
Formatting your bubbles
As you can see, the Google Maps' API does a lot of the hard work for you, making it easy to work with. The only problem is that the bubbles look a bit boring at the moment. You can make them a bit more interesting by adding another function to the map.js file for formatting the text in the bubble:
function formatWindow (input) {var html = "<div class=\"bubble\">";html += "<h1>" + input.homeTeam + " vs. " + input.awayTeam + "</h1>";html += "<p>" + input.information + "</p>";html += "<p>" if(input.fixture != null) {html += "<strong>Kick-off:</strong> " + input.fixture + "<br />";}/* Some more formatting */html += "</p></div>";return html;} This function takes in an object made from the JSON file and returns a string to go in the bubble. All that remains now is to call the function, so you'll need to change the line in the createMarker function from:
marker.openInfoWindowHtml( input.homeTeam + " vs. " + input.awayTeam ); to:
marker.openInfoWindowHtml( formatWindow(input) ); This will call the function to receive the string of HTML to display in the bubble, showing the text that you want your visitors to see.
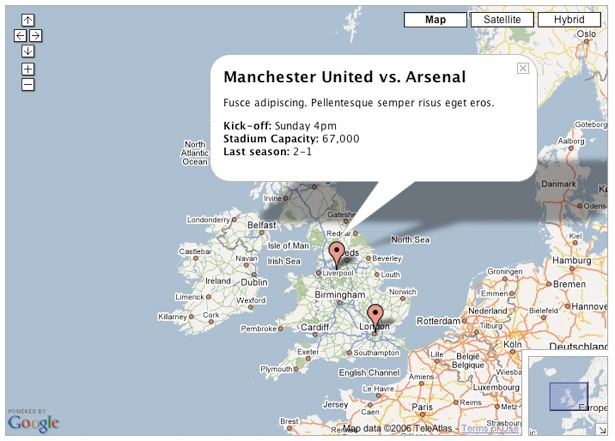
If you're wondering why your own bubble might not look exactly like the image, it's because I've added some CSS styling to my HTML document. Bubbles in Google Maps can be formatted in the same way as any HTML. If you look at my formatWindow function, you can see that I've wrapped the HTML in the bubble in a div tag with the class name 'bubble'. This means that in my CSS, I can add rules to format the contents of the bubble:
.bubble {width: 350px;}.bubble h1 {margin: 0;padding: 0;font-size: 150%;} Tabbed bubbles
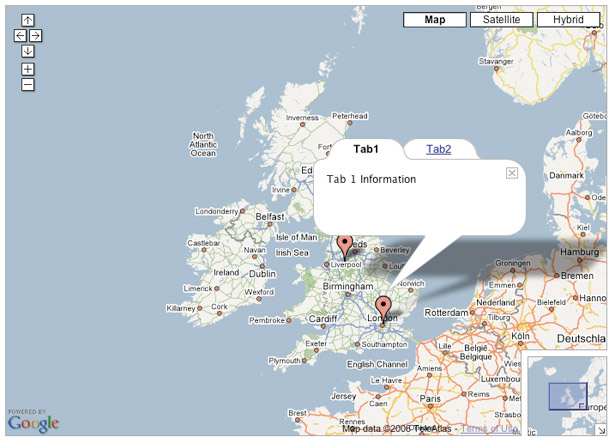
The more information there is the more bubbles you'll need, as well as a way of displaying large amounts of information in a small space. Luckily, the second version of Google Maps' API offers tabbed windows, and they're fairly easy to code. You just need to alter the createMarker function to accept an array of tabs:
function createMarker(input) {var marker = new GMarker(input.point);var tabs_array = [ new GInfoWindowTab("Tab1", "Tab 1 Information"),new GInfoWindowTab("Tab2", "Tab 2 Information") ];GEvent.addListener(marker, "click", function() {marker.openInfoWindowTabsHtml(tabs_array);});return marker;} This function creates a new marker point and a new array of GInfoWindowTab objects, which takes two parameters – the tab title and the tab content. This array then gets passed to 'openInfoWindowTabsHtml' method, which creates a bubble with tabs that appears when the marker is clicked.
Obviously tabs with 'Tab 2 Information' aren't very exciting, so try to format the it. You can also add two (or more, it's up to you) functions called formatTabOne and formatTabTwo – similar to the formatWindow function – to format each separate tab.
Changing your icons
It now looks great but there's still more to do. The default markers aren't the most attractive so make your own to replace them. PNGs usually give the best results for Google Maps and I recommend that your marker should be saved as one. You can add another function to the map.js file called makeIcon:
function makeIcon (image) {var icon = new GIcon();icon.image = image;icon.shadow = "images/shadow.png";icon.iconSize = new GSize(16, 16);icon.shadowSize = new GSize(24, 16);icon.iconAnchor = new GPoint(8, 16);icon.infoShadowAnchor = new GPoint(0, 0);icon.infoWindowAnchor = new GPoint(8, 1);return icon;} This function makes a new variable called 'icon', which is a GIcon, part of the Google Maps API. You can then specify what the icon will look like. Next, take the foreground icon image to be the argument of the function and set its foreground size (line four) and its shadow size (line five), and add anchors to the icon, which are all positioned from the top left of the foreground icon. iconAnchor (line six) is where the base of the foreground will sit on the map, infoShadowAnchor (line seven) is where the shadow's top left corner sits in relation to the foreground, and infoWindowAnchor (line eight) anchors the bubble to the foreground image. The function then returns the object.
Let's add some lines to the JSON file to let each marker know which image it wants the foreground icon image to be:
"markerImage": "images/red.png" This is just a path to where the image is in relation to the HTML file. Now you have to call the function somewhere, so let's alter the line in the earlier createMarker function from:
var marker = new GMarker(input.point); to:
var marker = new GMarker(input.point, makeIcon(input.markerImage) ); You should now get a map with some custom markers on it. As it's a football map, what better to use than some football shirts?
To finish it off add some more matches to the JSON file, as there's usually more than two matches played over the weekend. Now you should have a complete map.
Google provides good documentation on its site, which is helpful if you want to take the map even further. Check out some of the many services already based on Google Maps' API to gain more inspiration. Luckily, Google takes all the hard work out of using its maps within your projects – its powerful API provides all the hooks you need for simple coding and quick results.
Related articles
Source: https://www.creativebloq.com/netmag/working-google-maps-api-10067206
Posted by: edmundopalermoe0193605.blogspot.com
